Tips & Tricks for Taking Good Fingerprints
Getting a good print for your fingerprint keepsake is the first step to a beautiful and timeless piece.
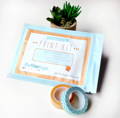
The inkless Print Kit
All fingerprint art keepsakes include an inkless Print Kit. The kit has everything you will need to take and return your fingerprints to complete your artwork. It is very easy to use and completely mess-free! You can view a short video about how to use the kit here.
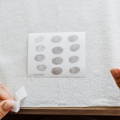
The kit has a special wipe that contains a non-toxic substance that reacts to the specially coated paper included. With just a light press of your finger, a black print will appear and develop to a slightly darker black over a the following minute.
The kit can capture very clear fingerprint lines, but a few tips - such as not pressing too hard and not rolling your finger as you take your print - will help you take the very best prints.
Problems with fingerprint lines
- Larger fingers (thumb vs. pinky) will be easier to capture all the lines because there is more space between the ridges.
- Men may have an easier time getting a clear print because their fingers are generally larger.
- If the lines aren't clear, try gently touching the paper without pressing down to avoid squishing the ridges together.
- You may have fingerprint lines that have been worn down from various things such as chemicals, aging, handling heavy, rough materials frequently. If this seems to be the case, try a different finger such as your middle or ring finger.
Take lots of prints; and take them separately
The most important tip is to do lots of tries! In order to get the best fingerprint art you should fill the whole card with your fingerprints. I sometimes get the print cards returned with only one print, and many times that person has pressed too hard and a lot of the details are lost.
- Fill up your card with prints; the more tries the better the chance for a really clear print
- Take your fingerprints separately, not in a heart shape. And, it's best to use the same finger for each person so the sizes match up.
- Multiple tries will help you get the hang of the right amount of pressure and have a lots of attempts produce clear fingerprints.
- If there part of print doesn't turn out well on one attempt, but is very clear in another, they prints can be combined to get a more complete and clear fingerprint.
- You will want to take your fingerprints separately, not in a heart shape (for the fingerprint guest books). You will have enough cards for each person taking prints, and the wipe can be used many times for many people. It feels dry when you open it, and it won’t dry out and will still work even after it has been open for a while.
USING THE KIT TO TAKE YOUR FINGERPRINTS
- Rub wipe around on your fingertip, it will feel dry and will last for multiple people and multiple tries.
- Lightly press finger straight down; don't roll or your true fingerprint shape will be lost. The chemical on the wipe will take a few moments to develop and darken.
- Reapply wipe as needed; approximately every other time or when prints appear too light.
- If you are having trouble capturing clean lines, try touching the paper very lightly and holding for 1-2 seconds.
- Take each person's prints on a separate card (not in a heart shape) and label with name.
- Taking your prints on the edge of a table can give you a better angle for taking your prints.
Have fun and don’t stress when capturing your fingerprints!
Whether you are creating family thumbprint art, couples fingerprint art, or a special single fingerprint keepsake you don’t need to spend too much time stressing about getting a good print.
And feel free to reach out if you are having any trouble getting a clear fingerprint.
Capturing your pet’s paw print is a beautiful and heartfelt way to honor the bond you share, and this blog...
Pet Parents Know this One Choice Can Mean the Difference Between A Detailed Impression and a Blurry Smudge How a...
Holiday Order Deadlines 2024 In preparation for the holiday rush, I’ve prepared essential dates and timelines to ensure your orders...
Preserving Memories in the Digital Age Why Every Pet Owner Should Consider a Digital Pet Paw Print How can you...


